vSphere 6.7 ESXi Host Installation and Configuration
Installation
To install an ESXi host you will need to verify that the hardware meets minimum requirements. The server platform also must be supported and listed in VMware Compatibility List (link). You most likely will be able to install ESXi on non-supported hardware, however, it should be done only for non-production environments, as VMware will not provide support for this installation.
The server running ESXi 6.7 requires at least 2 x CPU cores, 4GB of RAM, a Gigabit network adapter and if local disk is to be used for boot at least 5.2 GB of disk space must be available (or 4 GB for USB or SD boot). NX/SD bit for the CPU and hardware virtualization support in BIOS must be enabled.
Download ESXi installation file from VMware website (the filename is in VMware-VMvisor-Installler-<version>-<build>.x86_64.iso format).
Create a bootable optical disk (CD or DVD) or bootable USB flash drive. If you use a server with integrated management software, such as HP ILO or Dell DRAC, you can use virtual drive to mount ISO file over the network. To create bootable USB device on Linux follow this procedure (link). There are also utilities for Windows that can convert ISO to bootable USB, for example, rufus (link).
Interactive installation
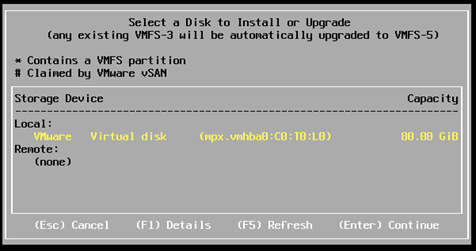
For the interactive installation boot the server from optical or flash drive and go through the setup prompts. You will need to select the local disk you want to install ESXi on. Unless you are performing an upgrade, all data on the disk will be removed.
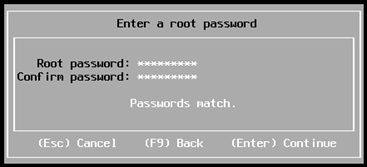
Enter a root password.
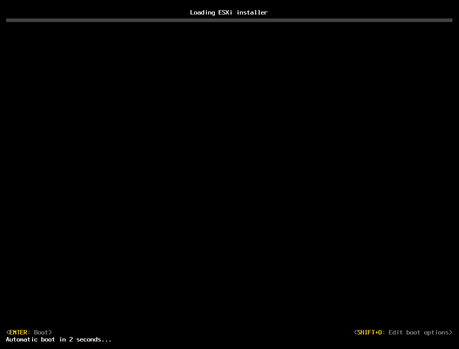
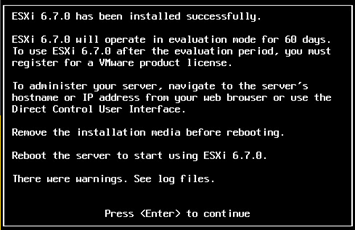
Once installation is completed, the installer will ask to remove the installation media and to reboot the server.
Scripted Installation
This is convenient way of automating installation of multiple hosts without having to go through the setup prompts. Instead you can create an answer file which will have all the required settings.
I will be using default configuration script, which performs installation of ESXi on the first disk, overwriting it and sets root password to myp@ssw0rd. As this file will be stored in clear text, the password should be changed immediately after the installation.
# Sample scripted installation file

# Accept the VMware End User License Agreement
vmaccepteula
# Set the root password for the DCUI and Tech Support Mode
rootpw myp@ssw0rd

# Install on the first local disk available on machine
install --firstdisk --overwritevmfs

# Set the network to DHCP on the first network adapter
network --bootproto=dhcp --device=vmnic0
Scripted installation can be used with DVD/USB flash media or PXE over-the-network deployment. To start the scripted installation from physical media, the first steps are the same as in interactive setup.
During the server start-up, select either optical or USB drive to boot from. Then choose to start installation (instead of booting from local disk). Press “Shift + O” within 5 seconds to Edit boot options, as shown in Figure 3.
The automatic boot will be stopped and CLI-prompt with “cdromBoot runweasel” pre-typed should appear.

At this stage you need to point installer to the path where configuration file is saved. One option is to use a network destination, such as Web, FTP or NFS server. Or local path can be used instead, for example, optical or USB flash drive.
Scripted Installation with local answer file
Let’s start with more simple option of having unattended file saved locally on USB flash drive or CDROM. I saved the default file shown in the listing above as CONFIG_SCRIPT.CFG and added it to the root of ISO image of ESXi installer prior to starting the installation process. In Windows OS to add files to ISO image, 3rd party utilities can be used like UltraISO or free utility AnyBurn.
Type-in one of the following commands after “cdromBoot runweasel” keywords. File name must be in uppercase:
ks=usb:/CONFIG_SCRIPT.CFG
ks=cdrom:/CONFIG_SCRIPT.CFG
As my file is on the same DVD as the installation media, I used the following command and pressed Enter.

Then the installation proceeded without any interruptions. Once it is completed, the following prompt is shown. Remove the installation media before rebooting the server, so the installation wouldn’t restart.
Scripted Installation with answer file on the Web server
Using Web server to store answer requires additional infrastructure to perform the installation, however, once it is configured configuration scripts can be centrally managed and distributed. Specify network settings with command line parameters shown in the listing below.
ks=<protocol>://<location>
ip=<ip_address>
netmask=<mask>
gateway=<gateway_address>
vlanid=<vlan_ID>
nameserver=<ip_address>
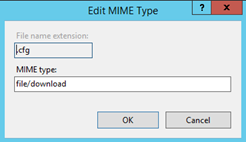
In this example, I’m using built-in IIS on a Windows Server machine with IP address of 172.16.17.75. IIS was installed with the default settings and the script file was placed into the Default Web Site folder (c:\inetpub\wwwroot). By default, Windows doesn’t allow files with .cfg extension to be downloaded. To overcome this, create a custom MIME type as per the screenshot in Figure 7.
The command entered on the host is shown in the Figure 8. IP address of 172.16.17.199 is allocated to ESXi host only for purpose of downloading the file during the setup. After installation, by default, DHCP address will be allocated to first adapter. As our server is referenced by IP (not by name), is on the same subnet and is reachable over native VLAN without 802.1q tagging, nameserver, gateway and vlanid options were omitted.

There are multiple unattended options available. To set the IP address and hostname to ESXi host after installation, the following options can be used:
network --bootproto=static --device=vmnic0 --ip=172.16.17.199 --netmask=255.255.255.0 --gateway=172.16.17.1 --hostname=TestESXi
PXE-based installation
Instead of using DVD or USB flash media, host can be booted in Preboot eXecution Environment (PXE) over the network. There are several steps host needs to complete to have ESXi installed:
- The server starts up and looks for DHCP to obtain an address and location of TFTP server that has the boot loader available
- Host contacts TFTP server to download boot loader binary
- Host contacts TFTP or Web server for kernel download
- Host downloads installation script using one of the network location as per previous section
The setup requires multiple external network components to be configured. Therefore, it is not discussed in detail.
Single Host ESXi Configuration
NTP client
Network Time Protocol synchronizes time on the network. NTP server provides time to its clients and its time source precision is defined as stratum level. Stratum 0 are atomic or GPS-based clocks. NTP servers can be synchronized in hierarchy and Stratum 1 servers are obtaining their time via Stratum 0 servers. The practical options are either to purchase an NTP appliance that is using GPS or to use Internet-based NTP servers (for example, NTP Pool Project).
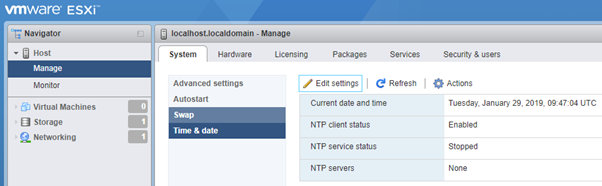
ESXi host can be configured as a NTP client. By default, NTP service is stopped and no servers are configured. To change the settings open “Time & date” configuration menu in VSphere host client as shown in Figure 9.
By pressing “Edit settings” button the configuration window shown in the Figure 10 opens.
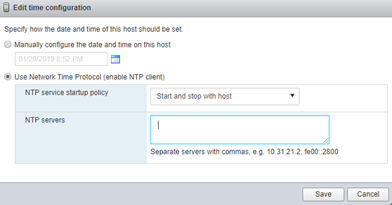
Change the startup policy to “Start and stop with host” and enter NTP server addresses.
Notice that the date and time is UTC, ESXi host doesn’t support the timezone setting.
DNS and Routing Configuration
VMkernel NIC is a virtual adapter that provides connectivity for the host system services, such as management access, IP storage, vMotion, vSAN and vSphere Replication (it is not used for virtual machines traffic). TCP/IP Stack is associated with VMkernel NICs and provides the way to define unique network-related settings for applications using different adapters. For example, you might have different default gateways in different VLANs and subnets for management and vMotion traffic.
Default TCP/IP stack is associated with pre-installed VMkernel adapter. To perform DNS and routing configuration you will need to adjust settings of this default TCP/IP stack. In vSphere Host Client click on Networking and select TCP/IP Stacks tab, as shown in Figure 11.
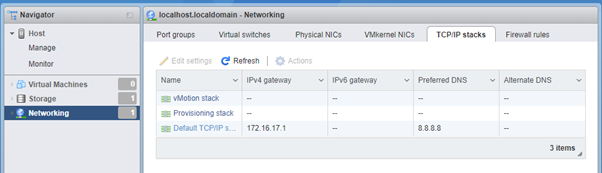
In the list of available stacks click on the Default TCP/IP stack. As displayed in Figure 12, current DNS settings are obtained via DHCP.

Press Edit settings button to set DNS configuration and default gateway.
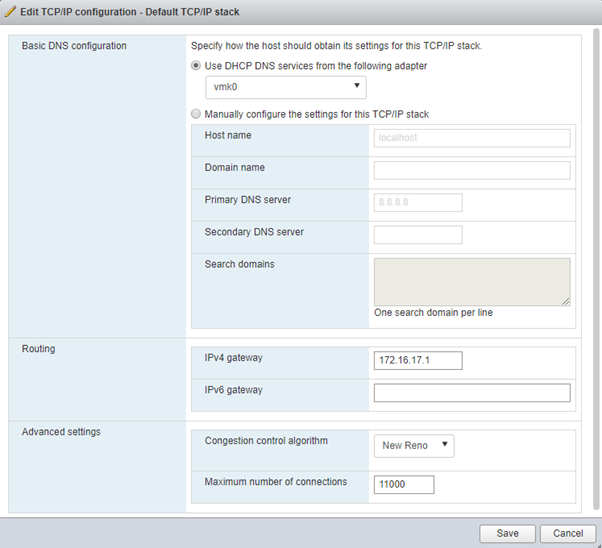
Note that you cannot add static routes using GUI. To add static route use ESXi Shell or SSH to the host and issue esxcli command with the following syntax:
esxcli network ip route ipv4 add –gateway <gateway_ip>
-network <destination_network/prefix_length>
The next section explains how to enable SSH and Shell access on ESXi 6.7 host.
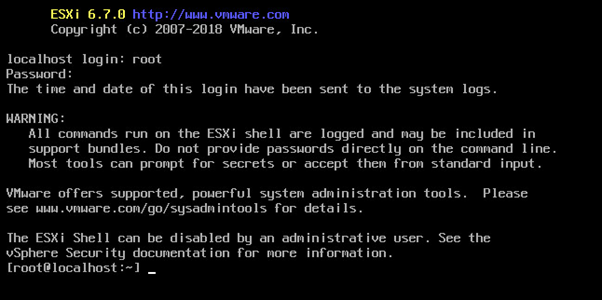
ESXi Shell Access
ESXi shell provides command line interface for host management operations. This mode can be accessed locally using directly attached keyboard and monitor or remotely via SSH. To access it locally press Alt + F1 on the keyboard. Use Alt + F2 to move back to menu-based console interface.
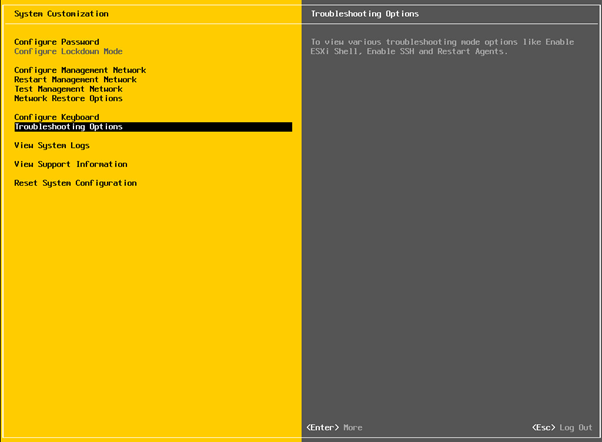
By default, ESXi Shell access via console or remotely via SSH is disabled. To enable you can either use menu-based console or vSphere Host Client.
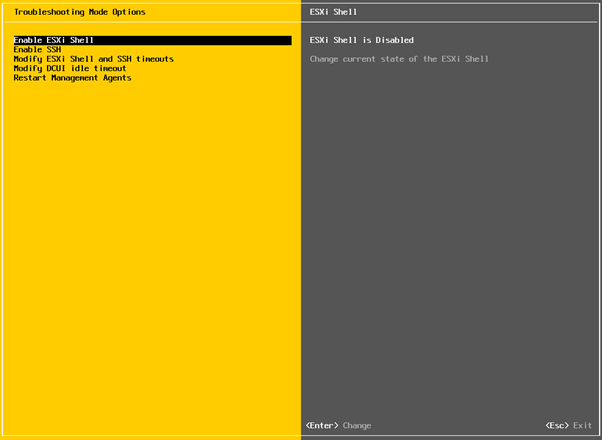
As shown in Figure 15 and Figure 16, console-based configuration is done via Troubleshooting Options Menu and then pressing Enter on Enable ESXi Shell or Enable SSH option.
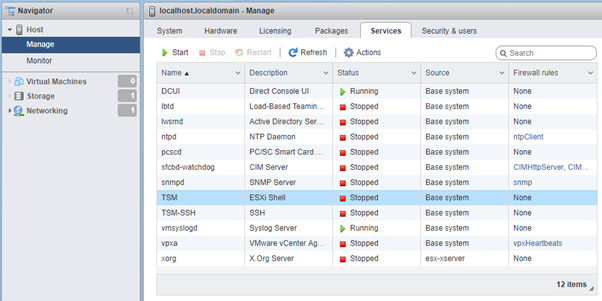
To perform the same operation in vSphere Host Client. Expand Host and click on Manage in Navigator on the left. Click on Services tab. TSM and TSM-SSH services are responsible for local console and SSH access.
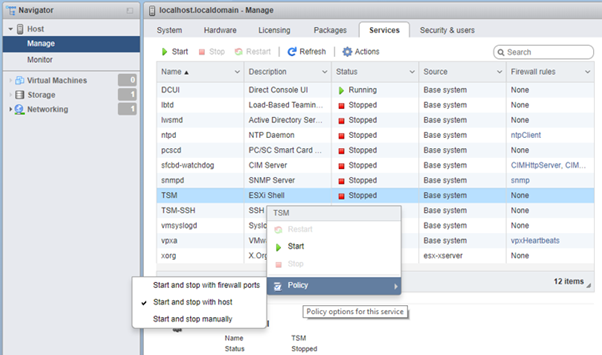
You can enable the service by selecting it and clicking Start button. The default startup policy is manual. To change it to auto-start right click on the service, then select Policy and choose Start and stop with host.
Logs and Syslog Server
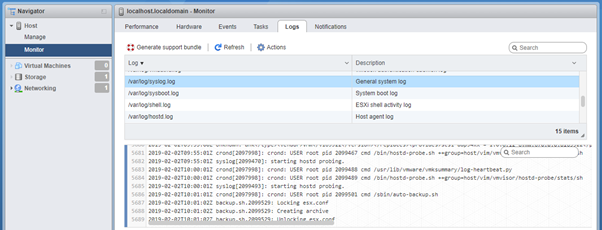
By default, ESXi stores logs locally. To access the logs, navigate to Host > Monitor menu, select Logs tab. General system messages are saved in /var/log/syslog.log file. Figure 19 shows the sample log content.
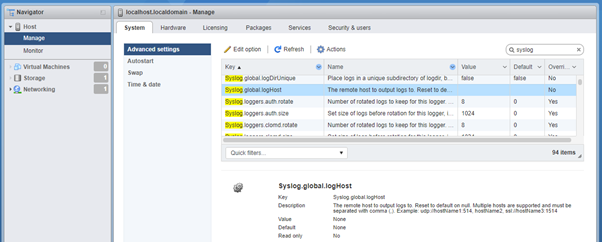
ESXi hosts can also send logs to an external Syslog server. To point ESXi host to a remote Syslog server, navigate to Host > Manage menu, select System tab and then Advanced settings, as shown in Figure 20. In the search box type-in “syslog” and change the value of key called Syslog.global.logHost. If there are multiple servers, separate them with commas. The format for a single server is <protocol>://<hostname>:<port>, for example udp://syslog.localdomain:514.
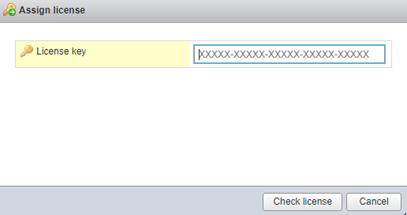
ESXi host licensing
Licenses can be applied directly to ESXi host, however, VMware recommendation is to do this via vCenter centrally. To apply it on the host level, navigate to Host > Manage menu, then click on Licensing Tab, as shown in Figure 21:
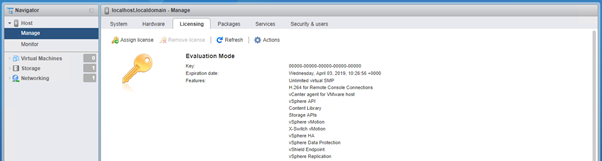
If the key is not entered, ESXi host will run in evaluation mode for 90 days with no feature restrictions. To use most of the advanced features vSphere vCenter is required. ESXi hypervisor with basic virtualization functionality is free, so you can obtain a perpetual license on VMware website. To apply a license, click Assign license button and enter License Key. ESXi edition information is encoded in the license key and corresponding features will be unlocked.