Azure Network Security Groups Explained
Microsoft Certified Azure Administrator Associate Exam (AZ-104) expects good knowledge of the topics in the list below.
- create security rules
- associate an NSG to a subnet or network interface
- evaluate effective security rules
The exam groups these topics under “Secure access to virtual networks” section along with Azure Bastion and Azure Firewall, which we will not cover in this article.
This blog post provides overview of Azure security concepts such as NSGs and security rules, as well as practical step-by-step examples on how to implement and validate their configuration.
Network Security Groups and Security Rules
An administrator can protect Azure resources by applying a Network Security Group (NSG) to a network interface or a subnet.
Figure 1 shows components of a Network Security Group.
Each security rule consists of the following fields:
- Rule name and description
- Priority number, which defines a position of the rule in the ruleset. Rules on the top are processed first, therefore, the smaller number has higher preference
- Source and destination with port numbers (for TCP and UDP)
- IP protocol type, such as TCP, UDP and ICMP. These 3 protocols cover almost all application requirements. “Any” keyword permits all IP protocols
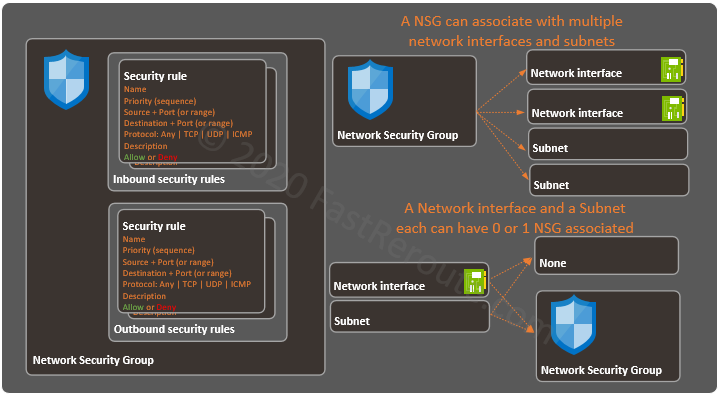
A Network Security Group can be applied to a Network interface and to a Subnet. Applying a NSG to a Subnet simplifies the rule management if all VMs in the subnet require the same security rules.
There is an incorrect assumption that Subnet-level NSGs work as ACLs on a default gateway device (such as a switch or a firewall) in a traditional network, which protects traffic as it enters subnet and doesn’t check connectivity within a subnet. Subnet level NSGs should be treated as template mechanism, they do affect traffic between VMs in the same subnet.
If no NSG is applied, then all traffic is allowed to and from a virtual machine.
Microsoft recommends to apply a NSG to either interface or subnet, but not to both.
As the diagram above shows, a single NSG can associate with multiple network interfaces and subnets. Each network interface or subnet can have 0 or 1 NSGs associated with it.
Inbound vs Outbound
A NSG contains two ordered lists of Security Rules – inbound and outbound.
NSG ruleset direction is evaluated from a VM perspective. For example, rules in inbound direction affect traffic that is being initiated from external sources, such as Internet or another VM, to a virtual machine. Outbound security rules affect traffic sent from a VM.
Return traffic for an established session is automatically allowed and is not validated against rules in the reverse direction. So we only need to focus on allowing (or denying) client-to-server direction of the session.
Default Security Rules
There are 6 default inbound (3) and outbound (3) rules that exist in each NSG. They cannot be removed or edited. An administrator can create custom rules to override the default ones.
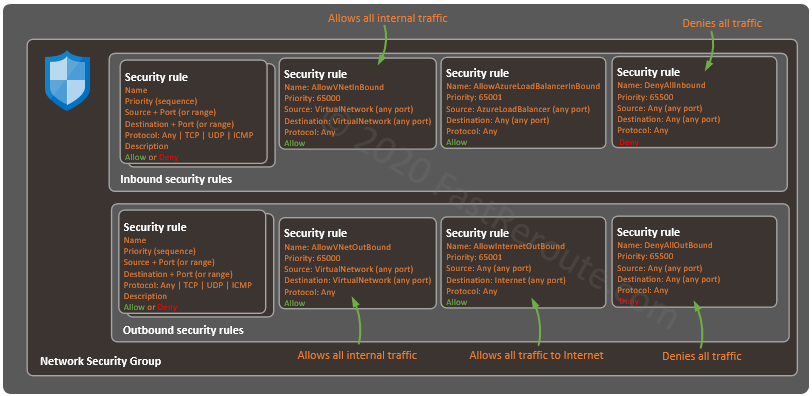
Figure 2 extends conceptual diagram shown in Figure 1 by adding the default rules. In addition to custom rules that users can define shown on the left side, additional 3 rules can be seen.
The first default rule with priority (or sequence number) of 65000 allows internal communication. It permits the traffic with the source and destination IP prefixes identified by service tag called VirtualNetwork.
VirtualNetwork service tag includes IP addresses of:
- Local VNet address space
- Peered VNets’ address space
- Address space of VNets connected to Virtual Network Gateway
- User-defined routes
- On-premises address spaces
- and default route (this can make NSG to become “permit any” if, for example, default route is advertised from on-premises network)
The second rule in inbound security ruleset allows access from Azure Load Balancer to any destination. In the outbound security ruleset, the rule with the same sequence number of 65001 allows unrestricted access to Internet.
The very last default rule in both inbound and outbound rulesets is “Deny all” rule. It means that if there are no “allow” rules that match the specific traffic, it will be dropped.
Evaluation Order
Packet is compared sequentially against each security rule until the first match is found. The further rules are not processed and the action in the matching rule is applied.
If a NSG is applied to a subnet and another one to a network interface, then both NSGs are processed. Subnet NSG is processed first. If a packet hits deny rule, including the default “Deny Any” rule, then the packet is dropped straight away. If packet is allowed by subnet NSG, then network interface’s NSG is evaluated.
NSG and Security Rules Step-by-Step Configuration
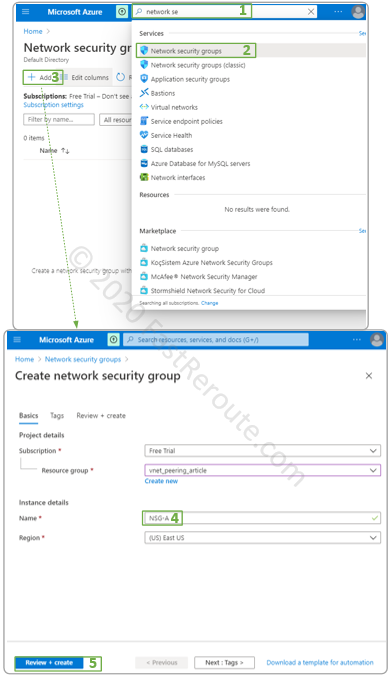
To create a Network Security Group start typing “network security” in search bar and select Network security groups in the list of Azure services.
Create a new NSG
In Network Security Groups window press Add to create a NSG. Select a Resource Group and name for NSG and press Review + Create button, as shown in Figure 3.
Once NSG is created, it will appear in the list shown in the upper part of Figure 3. Click on NSG to display its properties. As the screenshot below shows, overview window of NSG-A provides summary information, as well as inbound and outbound security rule content.
NSG configuration menu provides access to:
- Inbound security rules management
- Outbound security rules management
- Network interfaces to create an association with the NSG. This operation can also be performed via Network interface configuration pages
- Subnets to create association with the NSG. This operation can also be performed via VNet > Subnet menu configuration
- Effective security rules display

Modify Security Rules in NSG
During VM provisioning new NSG can be automatically created with the common management ports, such as RDP and SSH, as shown in Figure 5.
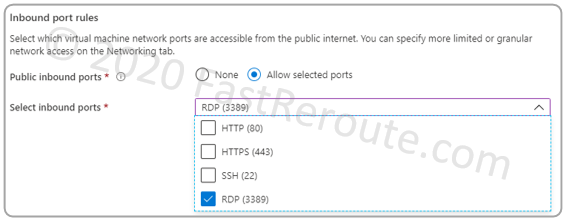
For this example, let’s assume that an administrator didn’t select any of the ports and we cannot connect to the VM remotely. To address this issue we will use NSG created in the previous step, allow RDP and associate the NSG with the VM’s NIC.
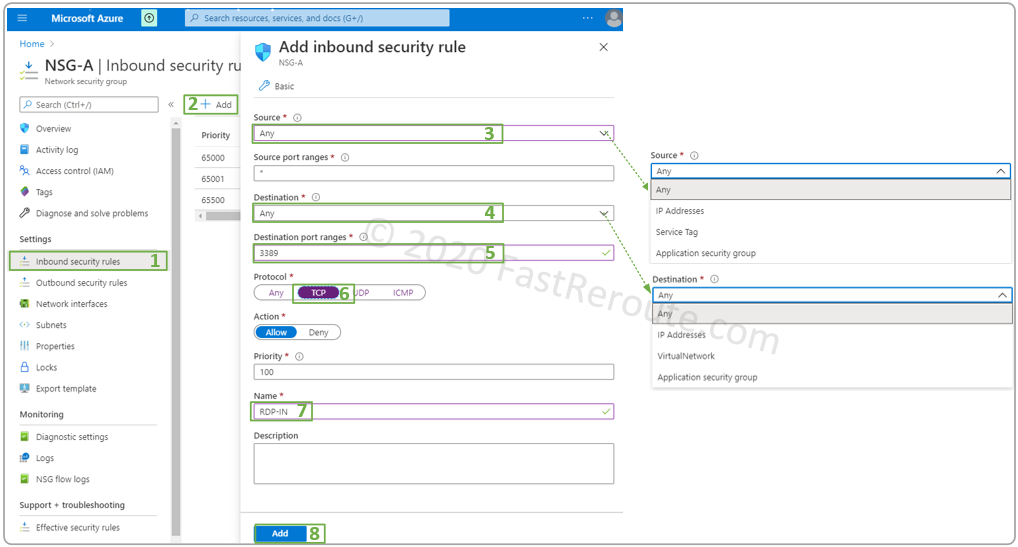
To add a new inbound security rule, click on the menu (#1). Then press Add (#2). Fill the information, as shown in the screenshot below and press Add.
Associate NSG with a Network Interface
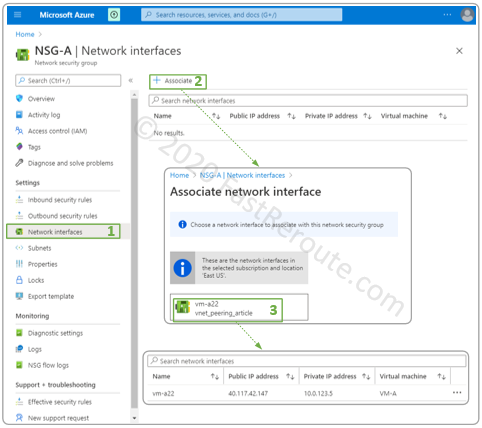
In the next step we will associate the NSG with the network interface of the VM, as shown in Figure 7. To enable this, within NSG configuration window, click on Network interfaces side menu (#1) and press Associate button (#2) and select the network interface.
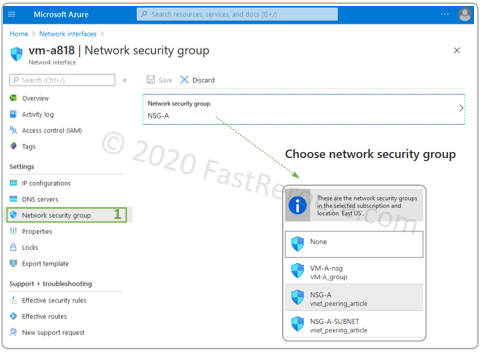
In some cases, the network interface will be greyed out. If this is the case, the configuration can be performed from the Network Interface configuration window. Navigate to the network interfaces list and select the one that you want to change NSG for. Choose Network security group menu (#1) and select choose the NSG that we created earlier.
Associate NSG with a Subnet
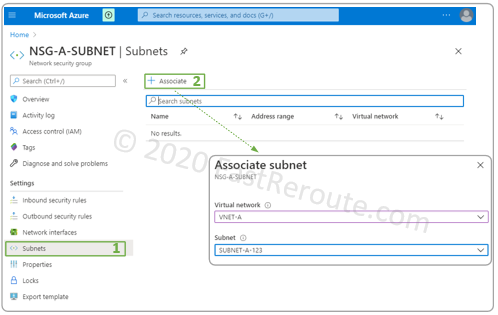
As with Network Adapter association, the configuration can be performed via properties of NSG or from Subnet configuration page. To associate with a subnet via NSG properties, open Subnets menu and click on Associate and then select the virtual network and the subnet as shown in Figure 9.
In this example, we have a NSG called NSG-A-SUBNET created earlier, which we will associate with the subnet.
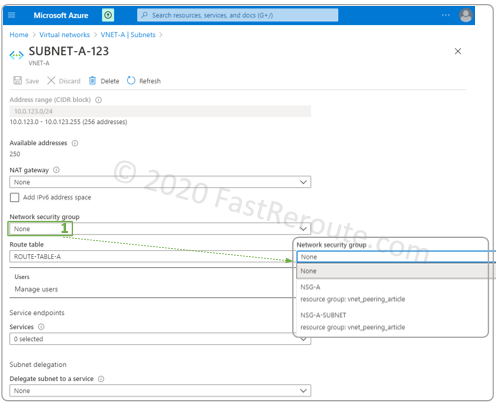
To perform the same procedure using Subnet properties, navigate to subnet configuration page via its parent VNet. Then select a Network security group drop-down box and choose the NSG.
View Effective Security Rules
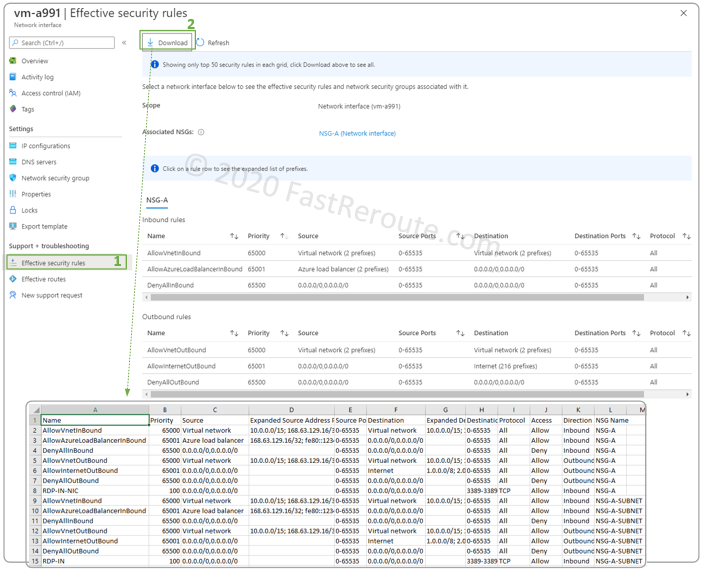
Azure Network Interface properties have a button called “Effective security rules”. To be able to display this page the virtual machine that has the interface attached must be powered on.
Opened window doesn’t display rules correctly currently, as shown in Figure 11. For example, we have RDP port opened inbound on both network interface and subnet level, which is not shown in the list of rules.
This page, however, allows us to download ruleset in CSV format, so an administrator can use Excel or some automation tool to analyze it. As shown in Figure 11, we can see our RDP rules, as well as expanded service tags. For example, we can see which IP addresses are included in Virtual Network service tag.
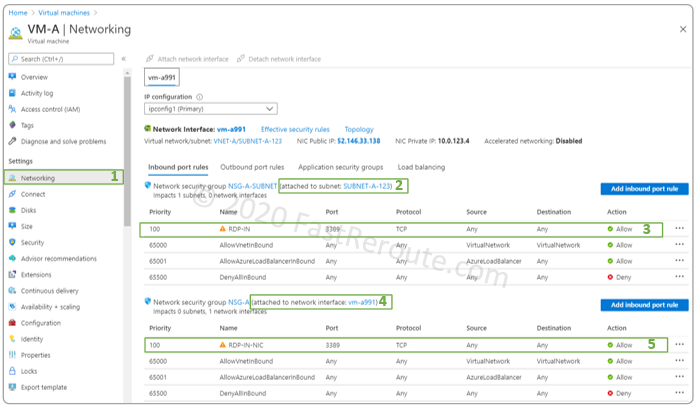
The other way to check what rules are currently applied at different levels is to use Networking properties of a VM, as shown in Figure 12. Notice how this page correctly displays subnet-level and network interface-level rules.
Self-Test Questions
What is a Network Security Group?
Network Security Group (NSG) is an Azure configuration element that contains set of network-level security rules which restrict traffic from and to Virtual Machines
How Network Security Group is applied?
A NSG can be applied either to Network Interface or to Subnet. It can be applied to both simultaneously, but it is not recommended
How many NSGs can be applied to a single Network Interface?
Zero or One