Implement and Manage Virtual Networking
In this blog post, we will explore the basics of Azure Virtual Networking. The target audience of this article is the candidates preparing for the Microsoft Azure Administrator Associate exam (AZ-104).
The exam topic comprises of 2 objectives:
- configure private and public IP addresses, network routes, network interface, subnets, and virtual network
- create and configure VNet peering
In this post, we will review only basic network configuration, which partially covers the first bullet point. The rest will be covered in the follow-up articles.
Azure Virtual Networking Basics
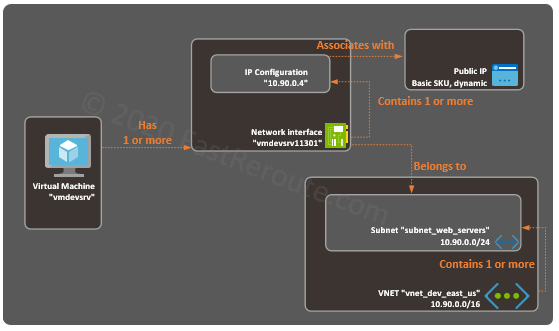
Figure 1 demonstrates how different components are working together. In the practical section of this blog post, we will go through the process of creating every element shown in this diagram.
Virtual Network (VNet)
Virtual Network (VNet) is an isolated virtual network environment within the Microsoft Azure cloud. VNETs provide connectivity to other Azure resources, the Internet, and the on-premises network.
A virtual network is scoped to a specific region and subscription. It is identified by a name and has one or many address spaces assigned (IPv4 CIDR block).
Subnets
An administrator can create one or multiple subnets within a single VNet. In the diagram above, a VNet named “vnet_dev_east_us” contains a subnet called “subnet_web_servers”. IP address prefix of a subnet is part of the larger VNet’s prefix.
Virtual Machines and Network Interfaces
Virtual machines can connect to a VNet and a subnet sharing the same region and subscription. Each virtual machine can have one or multiple network interfaces. A network interface is a virtual adapter that connects VM to a subnet.
A network interface is created automatically during VM provisioning. Network interfaces can be detached from VM and it is also possible to create a standalone network interface and attach it to a VM after its creation.
IP Configuration
Both private and public IP addresses are allocated to a network interface using IP configuration. Each IP configuration must have a private IPv4 address and optionally public IPv4 address assigned.
Additional IP configurations provide the ability to add multiple IP addresses to the interface. These IP addresses share the same subnet with the primary IP address.
Private IPs
An IP configuration of a network interface can have a static or a dynamically assigned private IP address in the Azure portal. The dynamic IP address should be used in scenarios when it is acceptable not to have a pre-defined IP address for a VM.
Setting up a static IP address ensures that the VM will be reachable using a pre-defined IP address. The setting in the Azure portal doesn’t enforce dynamic or manual configuration of an IP address within a virtual machine. For example, if the guest Operating System is configured as a DCHP client and Azure portal set to static, the Azure client will still get the address via DHCP. This behavior is similar to a DHCP reservation.
While the type of address assignment can be different, the IP address within the virtual machine must match the one configured in the Azure portal. For example, setting a private IP address statically, that mismatches Azure portal configuration will stop connectivity to that machine.
The First 4 IP addresses (subnet address + first 3 useable addresses) in every subnet are reserved.
Public IPs
Public IP is not configurable within the guest Operating System, which can only see private IP addresses. Azure performs address rewrite, so VM’s private IP address can receive traffic that sent from the Internet to its public IP address, and vice versa – traffic sent to the Internet from a VM is seen as originating from VM’s public IP.
Azure Public IP addresses provide both inbound and outbound connectivity from the Internet to the VM.
Public IPs can be of 2 types – basic SKU and standard SKU (SKU stands for Stock Keeping Unit).
Basic SKU Public IPs can be statically or dynamically allocated. VM with dynamically assigned public IP will release this address when it is stopped.
Standard SKU support high availability with zones and are slightly more expensive than basic SKUs. Standard SKU Public IPs support only static assignments.
Let’s perform simple hands-on configuration to apply the learned concepts to practice.
Create an Azure Virtual Network Step-by-Step
This section shows how to create an Azure Virtual Network step-by-step.
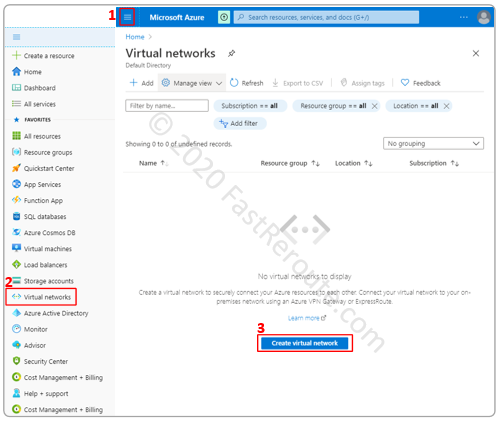
Navigate to Virtual networks administrative page, by selecting it in the left-side menu. In a newly created account, there will be no virtual networks. Click on “Create virtual network” to add one.
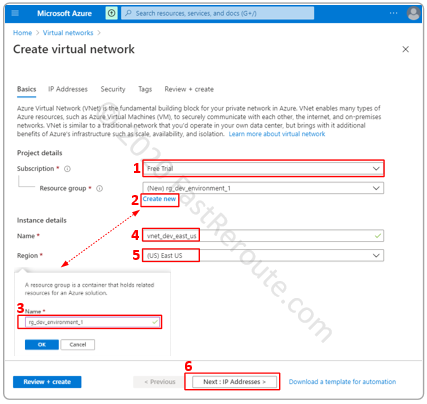
We will choose the only available subscription in our account, which is Free Trial. A subscription can contain resource groups; which have the purpose of grouping together resources with the same lifecycle. Let’s create a new resource group and name it rg_dev_environment_1.
Type-in a name for the VNet and region in which it will exist.
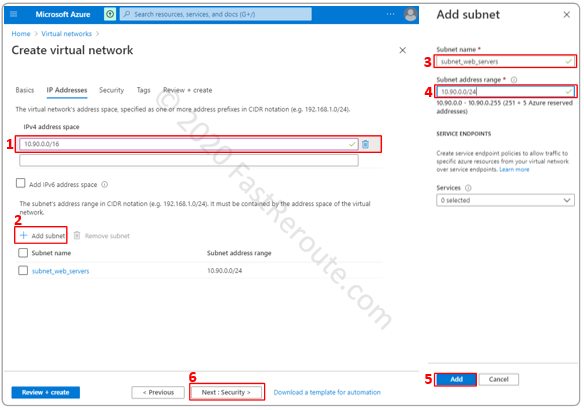
We will use an IPv4 address space of 10.90.0.0/16 and create a new subnet. It must be within VNet’s IP address space. In the example below, we’ve added subnet 10.90.0.0/24 and named it “subnet_web_servers”.
As shown in the screenshot below, it is possible to allocate multiple IPv4 address spaces to a virtual network.
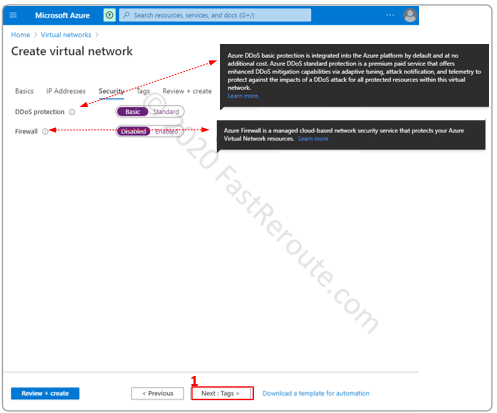
The next step provides an option to enable security features, such as DDoS protection and Firewall. For the purpose of this demonstration, we will keep the default settings.
Tagging provides the ability to add custom metadata to different resources, which can be used for management and billing purposes. We will proceed to the next step without applying any tags.

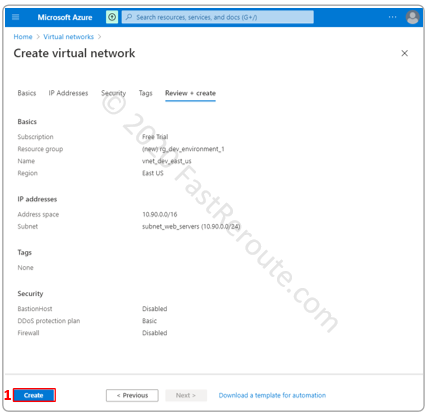
The final step of the wizard provides summary information. Click on Create button to add the network.
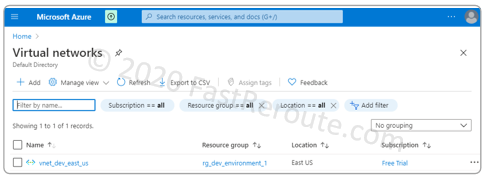
The Virtual networks list is now populated with the new VNet we’ve created.
Attaching a VM to Azure Virtual Network
This section demonstrates how to connect a virtual machine to a subnet in a virtual network while creating a new VM. Only network-relevant details will be shown and discussed.
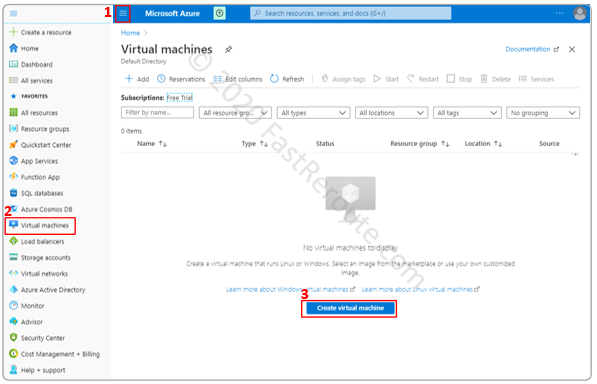
To add a new virtual machine, open the side menu, and select Virtual Machines. Click on the “Create virtual machine” button.
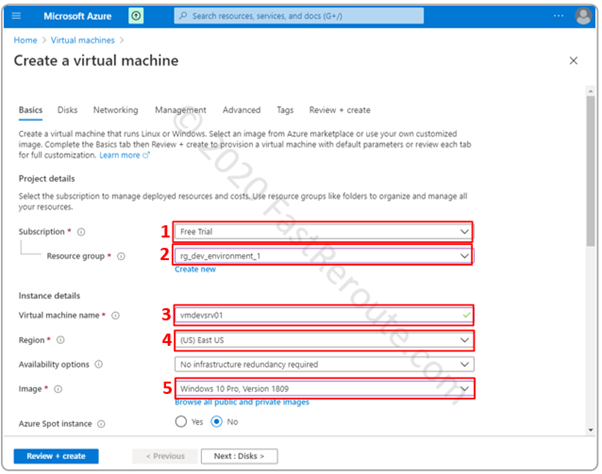
In the “Basics” dialogue window define general VM parameters, such as the subscription, resource group, and the virtual machine name. The regions of a VM should match the region of VNet, otherwise, the subnet will not be available for selection in the Networking step.
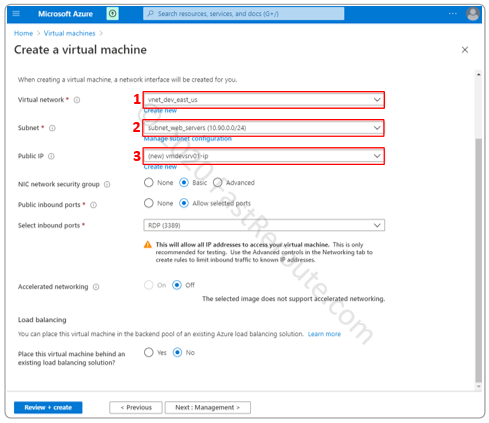
We moved straight to the Network configuration step skipping Disks configuration.
Figure 11 shows the configuration section related to networking. The virtual network drop-down menu will contain only VNets that are in the same region as the VM. We also select a subnet in which VM’s interface will be placed.
All remaining settings are left unchanged and VM has been created.
Reviewing the VM Configuration
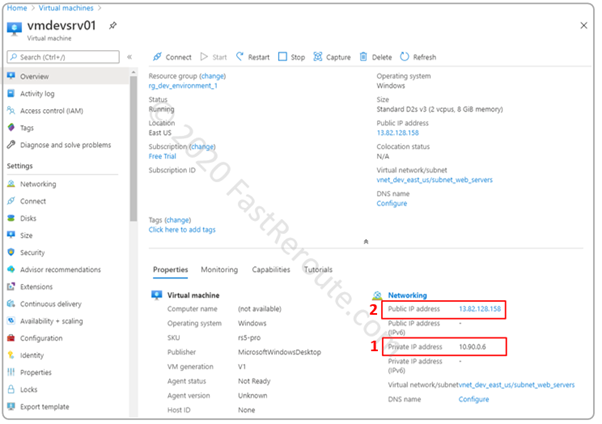
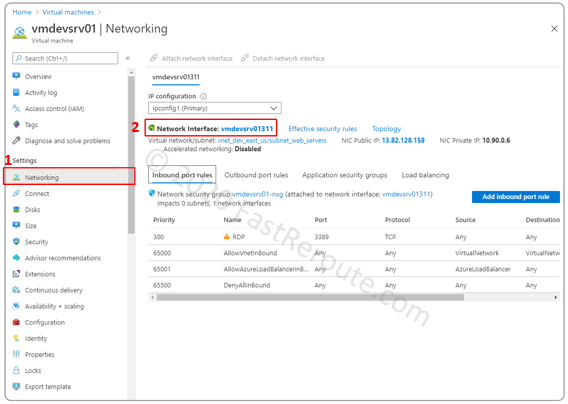
After a few minutes VM is provisioned and we can check its settings. As Figure 12 shows, the machine was assigned a private IP address of 10.90.0.6 with the public IP address of 13.82.128.158.
The networking submenu of the virtual machine displays network interface and Network Security Group (NSG) settings. Let’s click on the interface to see its configuration.
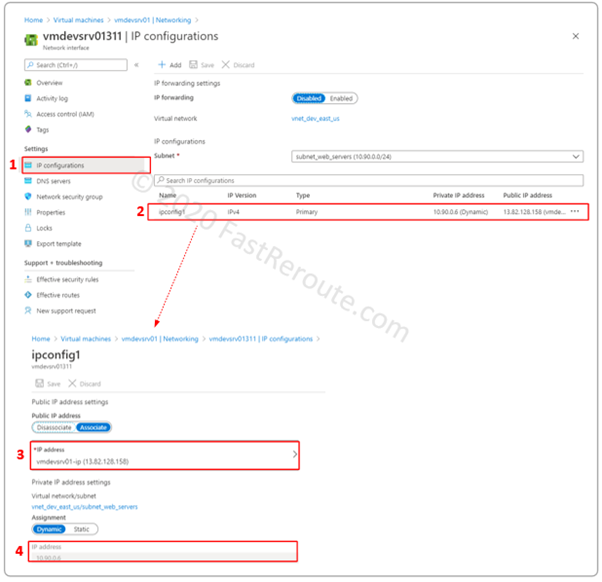
Network adapter settings include IP configurations. During the machine provisioning process, we could only access the primary IP configuration. This menu allows for creating additional IP configurations, which are similar to secondary IP addresses. It can be useful for adding multiple IP addresses, for example, for a web server with multiple websites, each available on different IP addresses.
This configuration menu also exposes the IP forwarding setting, which allows network adapter to accept packets that don’t have destination IP addresses matching any of the interface’s addresses. This configuration is required for devices that perform routing functions, such as 3rd party firewalls or intrusion protection systems.
Inbound Internet Connectivity
Public IP addresses provide inbound connectivity to a virtual machine over the Internet.
We can now use Remote Desktop Connection (RDP) client to access this virtual machine. To launch RDP client on Windows 10 machine start typing “Remote Desktop” and select the built-in application.
Type in the public IP address of the VM and press Connect in RDP client. Use credentials provided during VM provisioning (default username is AzureUser).
Outbound Internet Connectivity
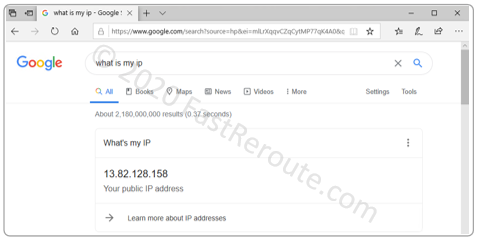
After connecting to a VM’s remote desktop, let’s open a web browser to test outbound Internet connectivity and check the public IP address that the VM uses.
To perform this testing, type in “what is my IP” request into the Google search bar. As shown in Figure 15, the outbound IP address matches the one we saw in the previous example.
Validating Routing Table in Azure portal
VNet uses the default route table to decide where to send Internet traffic when VM tries to connect to external resources. Subnets and route tables interaction will be a subject of one of the next blog posts, however, for now, we can check the effective routes as seen from VM’s network adapter point of view.
To do it navigate to Network interfaces menu, select Network adapter attached to the virtual machine, and click on Effective routes.
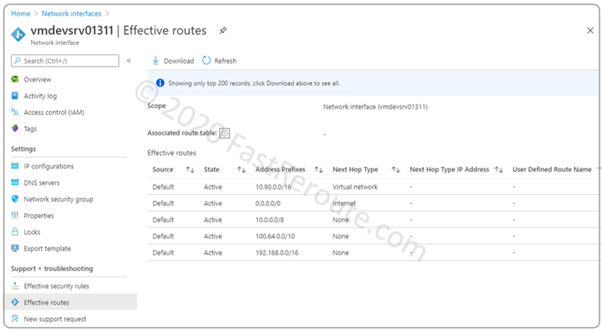
As shown in the screenshot, we can see that the default route has a Next Hop Type of Internet.
Self-Test Questions
Can a single VNet be used to provide connectivity for virtual machine that belong to multiple Microsoft Azure customers?
No, Virtual Network (VNet) is an isolated virtual network environment.
Can a single VNet span multiple regions in Azure?
No, a VNet is scoped to a specific region.
What is the relationship between a VNet and a subnet?
VNet contains one or more subnets.
Can a network interface exist separately from a virtual machine?
Yes, it is possible to create a network interface and later attach it to a VM
What is IP Configuration?
IP Configuration is a property of a network adapter that defines a single private IP address and, optionally, a single public IP address
When an administrator configures public IP address in Azure portal, does he need to configure it within guest Operating System?
No, Azure performs address rewrite, so a VM can see only private addresses at the network layer. Application payload still may contain public IP addresses, so in certain cases, a VM might need to know its public IP address.